Bootstrap Editor logo

Bootstrap Editor plugin
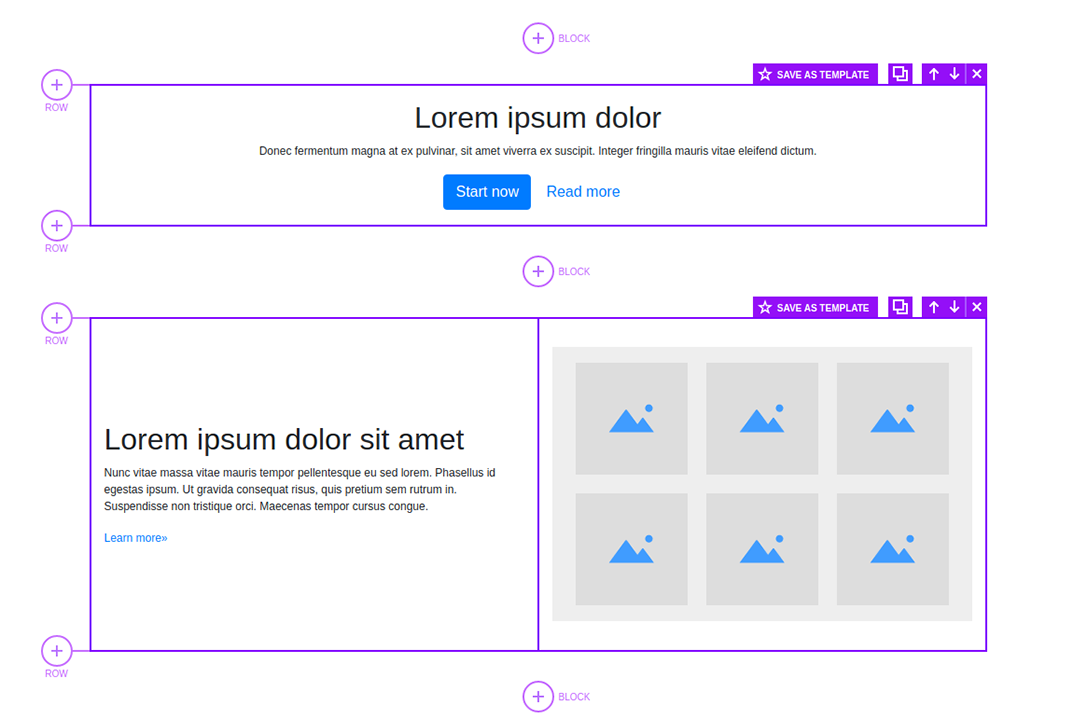
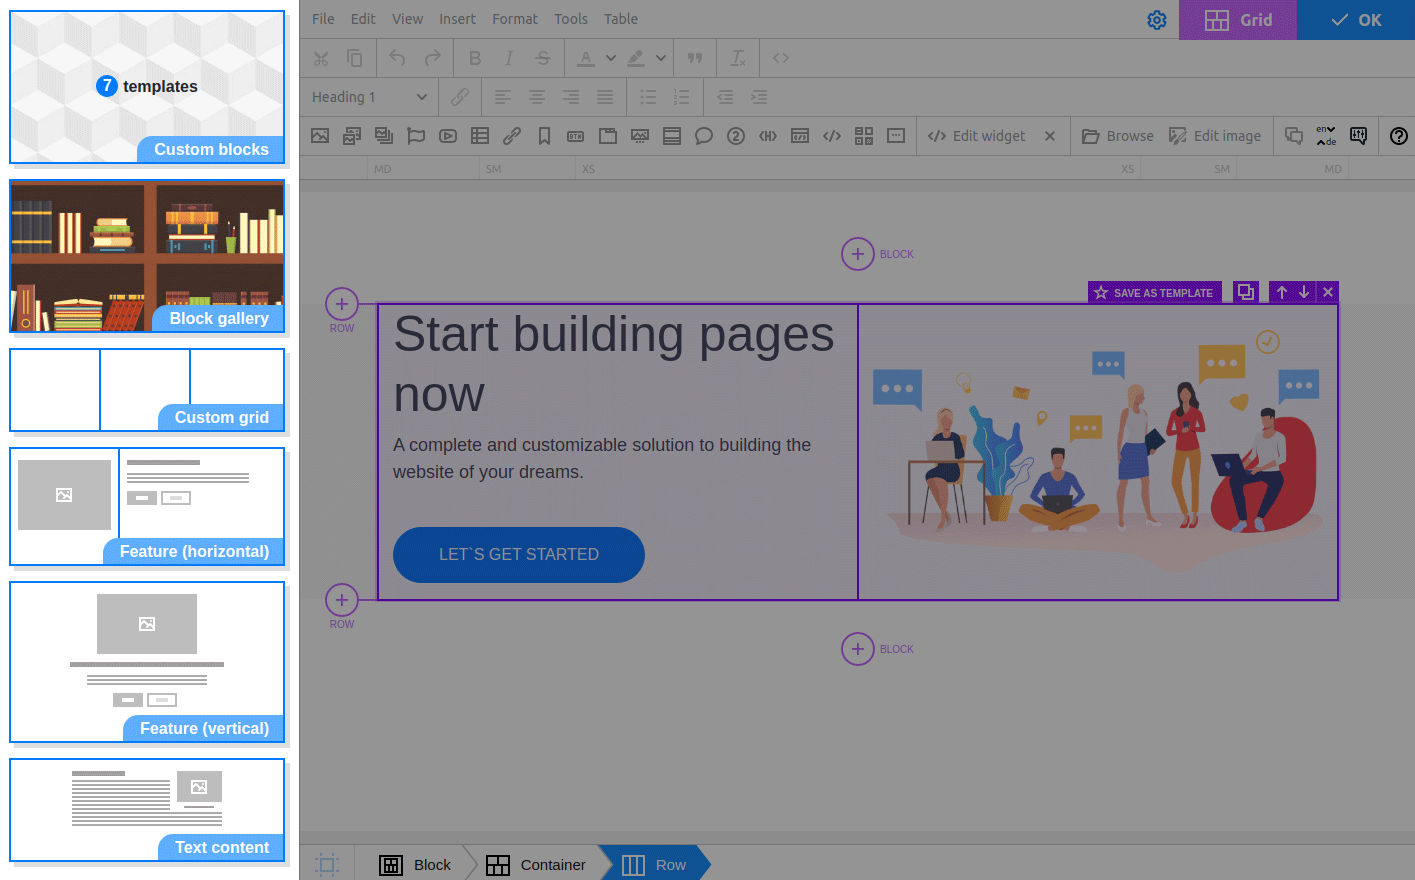
Layout manager, mobile support and Bootstrap widgets
Build layout from predefined blocks
Build layout from predefined blocksEdit column screenshotNew row screenshotEdit column screenshotBootstrap Editor editing of container screenshot
Bootstrap Editor logo

In addition to standard responsive content features available in N1ED, Bootstrap Editor adds new capabilities specially for Bootstrap 5 framework users (all other versions of Bootstrap are supported too).

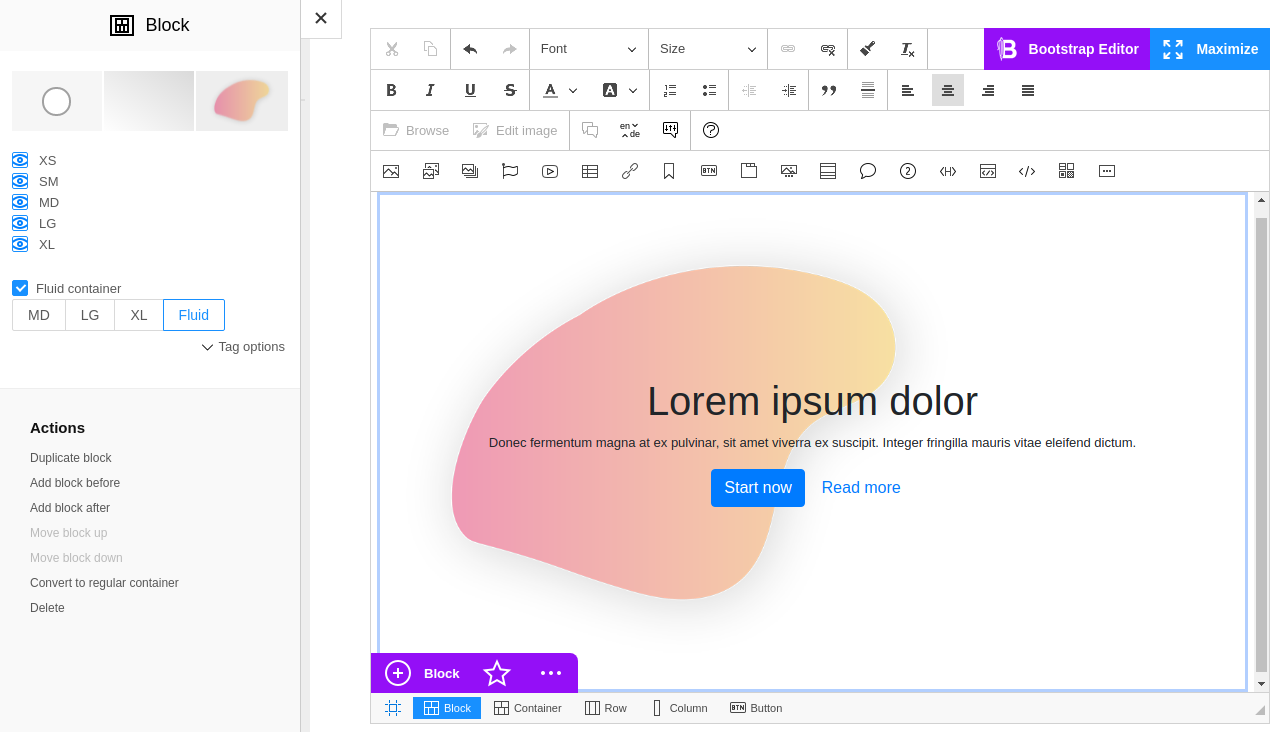
Bootstrap Editor plugs Bootstrap to the edited content making it look in the editor exactly as it would look on the page displayed to a user delivering true WYSIWYG (what you see is what you get). Also, you can plug in not only your own Bootstrap theme, but also additional styles if they are available. Fine tuning to a specific CMS is available to avoid conflicts with its admin panel display.

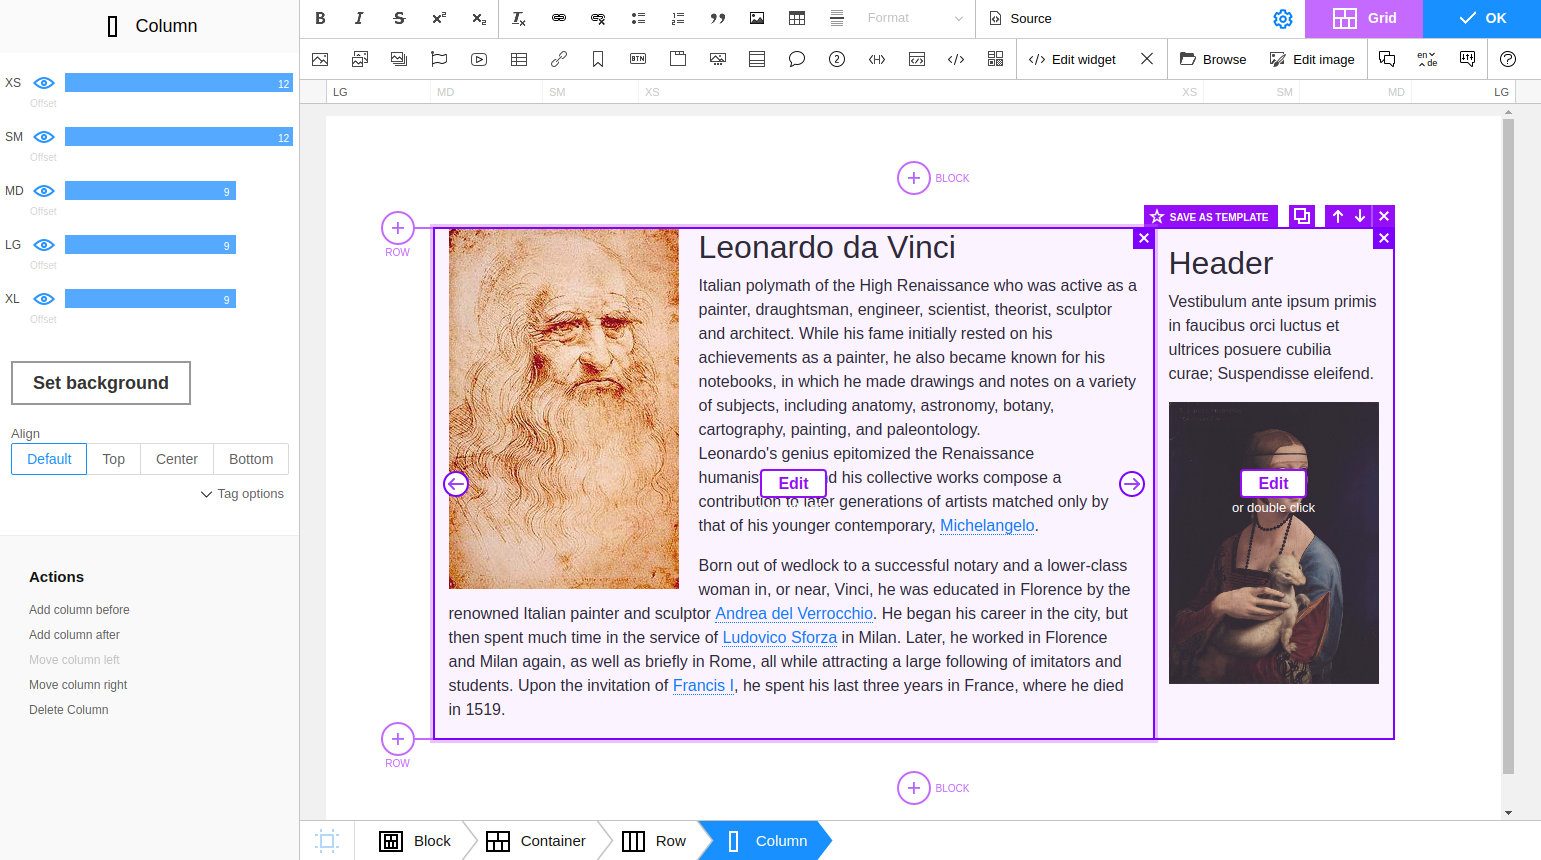
Own Layout Manager is a key feature of Bootstrap Editor. N1ED receives a new document structure editing mode where you can add, remove and edit columns, rows, containers, as well as configure their responsive look.

Also, Bootstrap Editor make corrections to the mobile preview in accordance with Bootstrap breakpoints, so you can see content exactly as your users see it on their mobile devices.

Additional widgets related to Bootstrap are available on the N1ED sidebar.

Get more info on Bootstrap Editor home page: https://n1ed.com/docs/addons/bootstrap-editor

Editor42 logo Editor42
TinyMCE logo TinyMCE
CKEditor 4 logo CKEditor 4
TinyMCE 5 logo TinyMCE 5
TinyMCE 4 logo TinyMCE 4

Install Bootstrap Editor plugin in Editor42
Download Bootstrap Editor
ZIP archive of Bootstrap Editor for Editor42
Self-hosted Editor42
Editor42 from CDN

Install the plugin to Editor42 hosted on your server

  1. Copy BootstrapEditor directory to editor42/plugins/.
  2. Edit Editor42 config and add BootstrapEditor to plugins parameter.

All the buttons this plugin will add to your toolbar automatically.

Example

Here you can see sample Editor42 initialization code with config inside it:

editor42.init({
    selector: "#editor",
    plugins: "BootstrapEditor",

    // apiKey: "...",
    // Get your own key in the Dashboard: https://n1ed.com/dashboard
});

Install the plugin to Editor42 loaded from CDN

  1. Copy BootstrapEditor directory somewhere on your server where it can be accessible by a link.
  2. Specify the location of just copied Bootstrap Editor plugin adding key-value pair in external_plugins Editor42 config parameter.
  3. Edit Editor42 config and add BootstrapEditor to plugins parameter.

All the buttons this plugin will add to your toolbar automatically.

Example

Here you can see sample initialization code of Editor42 loaded from CDN with config inside it:

editor42.init({
    selector: "#editor",
    plugins: "BootstrapEditor",
    external_plugins: {
        "BootstrapEditor": "http://example.com/public/BootstrapEditor/plugin.min.js",
    },

    // apiKey: "...",
    // Get your own key in the Dashboard: https://n1ed.com/dashboard
});

Bootstrap Editor comes as a part of N1ED. Read the official installation manual on developer website to know more.

Install Bootstrap Editor plugin in TinyMCE
Download Bootstrap Editor
ZIP archive of Bootstrap Editor for TinyMCE
Self-hosted TinyMCE
Cloud TinyMCE

Install the plugin to TinyMCE hosted on your server

  1. Copy BootstrapEditor directory to tinymce/plugins/.
  2. Edit TinyMCE config and add BootstrapEditor to plugins parameter.

All the buttons this plugin will add to your toolbar automatically.

Example

Here you can see sample TinyMCE initialization code with config inside it:

tinymce.init({
    selector: "#editor",
    plugins: "BootstrapEditor",

    // apiKey: "...",
    // Get your own key in the Dashboard: https://n1ed.com/dashboard
});

Install the plugin to cloud edition of TinyMCE

  1. Copy BootstrapEditor directory somewhere on your server where it can be accessible by a link.
  2. Specify the location of just copied Bootstrap Editor plugin adding key-value pair in external_plugins TinyMCE config parameter.
  3. Edit TinyMCE config and add BootstrapEditor to plugins parameter.

All the buttons this plugin will add to your toolbar automatically.

Example

Here you can see sample cloud TinyMCE initialization code with config inside it:

tinymce.init({
    selector: "#editor",
    plugins: "BootstrapEditor",
    external_plugins: {
        "BootstrapEditor": "http://example.com/public/BootstrapEditor/plugin.min.js",
    },

    // apiKey: "...",
    // Get your own key in the Dashboard: https://n1ed.com/dashboard
});

Bootstrap Editor comes as a part of N1ED. Read the official installation manual on developer website to know more.

Install Bootstrap Editor plugin in CKEditor 4

Download Bootstrap Editor
ZIP archive of Bootstrap Editor for CKEditor 4

Then do these simple steps:

  1. From the archive, copy plugins/BootstrapEditor/ to ckeditor/plugins/BootstrapEditor/, and its skin skins/n1theme/ to ckeditor/skins/n1theme/.
  2. Edit CKEditor config: add BootstrapEditor to extraPlugins parameter and switch the skin to n1theme.

All the buttons this plugin will add to your toolbar automatically.

Using config file
Using initialization script

If you prefer to edit config.js of CKEditor, or your CKEditor is initialized in some non-editable part of your CMS, make these changes there:

CKEDITOR.editorConfig = function(config) {
    config.extraPlugins = "BootstrapEditor";
    config.skin = "n1theme";                   // N1ED's own theme for CKEditor
    config.allowedContent = true;              // keep the classes and attributes N1ED writes
    config.removePlugins = "iframe,magicline"; // N1ED has better support of this
    config.versionCheck = false;               // skip its upgrade notice of CKEditor itself

    // config.apiKey = "...";
    // Get your own key in the Dashboard: https://n1ed.com/dashboard
};

Some CMSs do not use config.js and let you edit only the CKEditor initialization script. Make these changes there:

CKEDITOR.replace("editorId", {
    extraPlugins: "BootstrapEditor",
    skin: "n1theme",                   // N1ED's own theme for CKEditor
    allowedContent: true,              // keep the classes and attributes N1ED writes
    removePlugins: "iframe,magicline", // N1ED has better support of this
    versionCheck: false,               // skip its upgrade notice of CKEditor itself

    // apiKey: "...",
    // Get your own key in the Dashboard: https://n1ed.com/dashboard
});

Bootstrap Editor comes as a part of N1ED. Read the official installation manual on developer website to know more.

Install Bootstrap Editor plugin in TinyMCE 5

Download Bootstrap Editor
ZIP archive of Bootstrap Editor for TinyMCE 5
Self-hosted TinyMCE 5
Cloud TinyMCE 5

Install the plugin to TinyMCE 5 hosted on your server

  1. Copy BootstrapEditor directory to tinymce/plugins/.
  2. Edit TinyMCE config and add BootstrapEditor to plugins parameter.

All the buttons this plugin will add to your toolbar automatically.

Example

Here you can see sample TinyMCE initialization code with config inside it:

tinymce.init({
    selector: "#editor",
    plugins: "BootstrapEditor",

    // apiKey: "...",
    // Get your own key in the Dashboard: https://n1ed.com/dashboard
});

Install the plugin to cloud edition of TinyMCE 5

  1. Copy BootstrapEditor directory somewhere on your server where it can be accessible by a link.
  2. Specify the location of just copied Bootstrap Editor plugin adding key-value pair in external_plugins TinyMCE config parameter.
  3. Edit TinyMCE config and add BootstrapEditor to plugins parameter.

All the buttons this plugin will add to your toolbar automatically.

Example

Here you can see sample cloud TinyMCE initialization code with config inside it:

tinymce.init({
    selector: "#editor",
    plugins: "BootstrapEditor",
    external_plugins: {
        "BootstrapEditor": "http://example.com/public/BootstrapEditor/plugin.min.js",
    },

    // apiKey: "...",
    // Get your own key in the Dashboard: https://n1ed.com/dashboard
});

Bootstrap Editor comes as a part of N1ED. Read the official installation manual on developer website to know more.

Install Bootstrap Editor plugin in TinyMCE 4

Download Bootstrap Editor
ZIP archive of Bootstrap Editor for TinyMCE 4

Then do these simple steps:

  1. Copy BootstrapEditor directory to tinymce/plugins/.
  2. Edit TinyMCE config and add BootstrapEditor to plugins parameter.

All the buttons this plugin will add to your toolbar automatically.

Example

Here you can see sample TinyMCE initialization code with config inside it:

tinymce.init({
    selector: "#editor",
    plugins: "BootstrapEditor",

    // apiKey: "...",
    // Get your own key in the Dashboard: https://n1ed.com/dashboard
});

Bootstrap Editor comes as a part of N1ED. Read the official installation manual on developer website to know more.

Reviews

We purchased the Bootstrap Editor plugin for one of our project. It’s an awesome content builder and we plan to use it for our other websites.

User icon
Robert D.
Agency

Hi from Italy, we are little small company doing custom dev with ruby on rails. We've switched to your bootstrap editor after deep testing.

And now I have to say the editor made our work much easier. Thanks!

User icon
Gino C.
Agency

We were looking for the best option to implement the Bootstrap’s CSS features in TinyMCE which we use in our internal CMS to manage content pages.

Bootstrap Editor looks promising and we immediately keened to integrate it. Thanks for your job.

User icon
Patrick R.
Agency

Grid constructor solved my problems! I really love ready-to-use bootstrap blocks. Thank you for this great tool.

User icon
Arya R.
Freelancer

We are a data management company for small non profit organizations. We are using bootstrap editor for our support staff to configure donation, registration, and help pages. We are lucky to find this solution for content editing!

User icon
Kevyn S.
Agency

I was looking for Bootstrap 4 plugin into TinyMCE editor. But I didn't expect to find a complete Bootstrap builder! It's so cool!

User icon
Mica K.
Individual