Templates logo

Templates plugin

Insert templates from predefined gallery
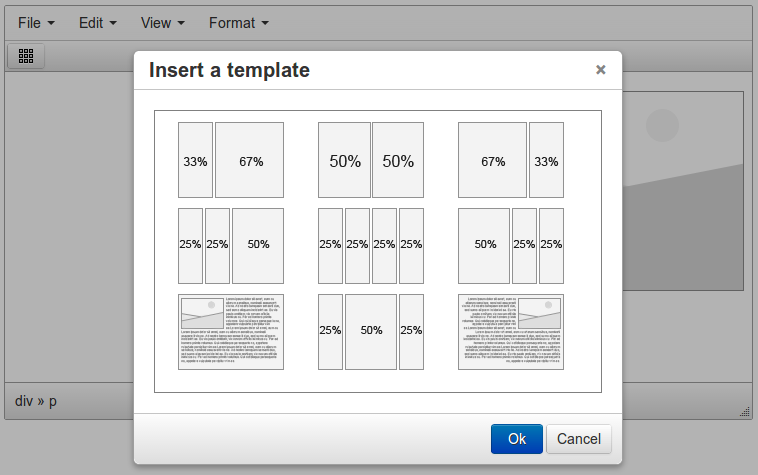
Templates screenshot
Templates logo

TinyMCE Templates is a plugin for very quick and simple inserting templates into your document. The plugins has set of predefined templates.

TinyMCE Templates can be shown as popup or as dialog.

Editor42 logo Editor42

TinyMCE logo TinyMCE
CKEditor 4 logo CKEditor 4
TinyMCE 5 logo TinyMCE 5
TinyMCE 4 logo TinyMCE 4

Install Templates plugin in Editor42

Download Templates
ZIP archive of Templates for Editor42
Self-hosted Editor42
Editor42 from CDN

Install the plugin to Editor42 hosted on your server

  1. Copy Templates directory to editor42/plugins/.
  2. Edit Editor42 config and add Templates to plugins parameter.

All the buttons this plugin will add to your toolbar automatically.

Example

Here you can see sample Editor42 initialization code with config inside it:

editor42.init({
    selector: "#editor",
    plugins: "Templates",

    // apiKey: "...",
    // Get your own key in the Dashboard: https://n1ed.com/dashboard
});

Install the plugin to Editor42 loaded from CDN

  1. Copy Templates directory somewhere on your server where it can be accessible by a link.
  2. Specify the location of just copied Templates plugin adding key-value pair in external_plugins Editor42 config parameter.
  3. Edit Editor42 config and add Templates to plugins parameter.

All the buttons this plugin will add to your toolbar automatically.

Example

Here you can see sample initialization code of Editor42 loaded from CDN with config inside it:

editor42.init({
    selector: "#editor",
    plugins: "Templates",
    external_plugins: {
        "Templates": "http://example.com/public/Templates/plugin.min.js",
    },

    // apiKey: "...",
    // Get your own key in the Dashboard: https://n1ed.com/dashboard
});

Templates comes as a part of N1ED. Read the official installation manual on developer website to know more.

Install Templates plugin in TinyMCE

Download Templates
ZIP archive of Templates for TinyMCE
Self-hosted TinyMCE
Cloud TinyMCE

Install the plugin to TinyMCE hosted on your server

  1. Copy Templates directory to tinymce/plugins/.
  2. Edit TinyMCE config and add Templates to plugins parameter.

All the buttons this plugin will add to your toolbar automatically.

Example

Here you can see sample TinyMCE initialization code with config inside it:

tinymce.init({
    selector: "#editor",
    plugins: "Templates",

    // apiKey: "...",
    // Get your own key in the Dashboard: https://n1ed.com/dashboard
});

Install the plugin to cloud edition of TinyMCE

  1. Copy Templates directory somewhere on your server where it can be accessible by a link.
  2. Specify the location of just copied Templates plugin adding key-value pair in external_plugins TinyMCE config parameter.
  3. Edit TinyMCE config and add Templates to plugins parameter.

All the buttons this plugin will add to your toolbar automatically.

Example

Here you can see sample cloud TinyMCE initialization code with config inside it:

tinymce.init({
    selector: "#editor",
    plugins: "Templates",
    external_plugins: {
        "Templates": "http://example.com/public/Templates/plugin.min.js",
    },

    // apiKey: "...",
    // Get your own key in the Dashboard: https://n1ed.com/dashboard
});

Templates comes as a part of N1ED. Read the official installation manual on developer website to know more.

Install Templates plugin in CKEditor 4

Download Templates
ZIP archive of Templates for CKEditor 4

Then do these simple steps:

  1. From the archive, copy plugins/Templates/ to ckeditor/plugins/Templates/, and its skin skins/n1theme/ to ckeditor/skins/n1theme/.
  2. Edit CKEditor config: add Templates to extraPlugins parameter and switch the skin to n1theme.

All the buttons this plugin will add to your toolbar automatically.

Using config file
Using initialization script

If you prefer to edit config.js of CKEditor, or your CKEditor is initialized in some non-editable part of your CMS, make these changes there:

CKEDITOR.editorConfig = function(config) {
    config.extraPlugins = "Templates";
    config.skin = "n1theme";                   // N1ED's own theme for CKEditor
    config.allowedContent = true;              // keep the classes and attributes N1ED writes
    config.removePlugins = "iframe,magicline"; // N1ED has better support of this
    config.versionCheck = false;               // skip its upgrade notice of CKEditor itself

    // config.apiKey = "...";
    // Get your own key in the Dashboard: https://n1ed.com/dashboard
};

Some CMSs do not use config.js and let you edit only the CKEditor initialization script. Make these changes there:

CKEDITOR.replace("editorId", {
    extraPlugins: "Templates",
    skin: "n1theme",                   // N1ED's own theme for CKEditor
    allowedContent: true,              // keep the classes and attributes N1ED writes
    removePlugins: "iframe,magicline", // N1ED has better support of this
    versionCheck: false,               // skip its upgrade notice of CKEditor itself

    // apiKey: "...",
    // Get your own key in the Dashboard: https://n1ed.com/dashboard
});

Templates comes as a part of N1ED. Read the official installation manual on developer website to know more.

Install Templates plugin in TinyMCE 5

Download Templates
ZIP archive of Templates for TinyMCE 5
Self-hosted TinyMCE 5
Cloud TinyMCE 5

Install the plugin to TinyMCE 5 hosted on your server

  1. Copy Templates directory to tinymce/plugins/.
  2. Edit TinyMCE config and add Templates to plugins parameter.

All the buttons this plugin will add to your toolbar automatically.

Example

Here you can see sample TinyMCE initialization code with config inside it:

tinymce.init({
    selector: "#editor",
    plugins: "Templates",

    // apiKey: "...",
    // Get your own key in the Dashboard: https://n1ed.com/dashboard
});

Install the plugin to cloud edition of TinyMCE 5

  1. Copy Templates directory somewhere on your server where it can be accessible by a link.
  2. Specify the location of just copied Templates plugin adding key-value pair in external_plugins TinyMCE config parameter.
  3. Edit TinyMCE config and add Templates to plugins parameter.

All the buttons this plugin will add to your toolbar automatically.

Example

Here you can see sample cloud TinyMCE initialization code with config inside it:

tinymce.init({
    selector: "#editor",
    plugins: "Templates",
    external_plugins: {
        "Templates": "http://example.com/public/Templates/plugin.min.js",
    },

    // apiKey: "...",
    // Get your own key in the Dashboard: https://n1ed.com/dashboard
});

Templates comes as a part of N1ED. Read the official installation manual on developer website to know more.

Install Templates plugin in TinyMCE 4

Download Templates
ZIP archive of Templates for TinyMCE 4

Then do these simple steps:

  1. Copy Templates directory to tinymce/plugins/.
  2. Edit TinyMCE config and add Templates to plugins parameter.

All the buttons this plugin will add to your toolbar automatically.

Example

Here you can see sample TinyMCE initialization code with config inside it:

tinymce.init({
    selector: "#editor",
    plugins: "Templates",

    // apiKey: "...",
    // Get your own key in the Dashboard: https://n1ed.com/dashboard
});

Templates comes as a part of N1ED. Read the official installation manual on developer website to know more.