Bootstrap Tools logo

Bootstrap Tools plugin

Bootstrap Tools with a lot of features to handle Bootstrap column structure
Bootstrap Tools screenshot
Bootstrap Tools screenshotColumn dialog screenshotRow dialog screenshot
Bootstrap Tools logo

Create and edit any widgets of Bootstrap's framework, manipulate its blocks, insert any Bootstrap's icons in WYSIWYG mode. This is the most flexible solution to operate Bootstrap in TinyMCE, but and the most simple: it already has a plugin for quick and codeless including Bootstrap into your WYSIWYG editor.

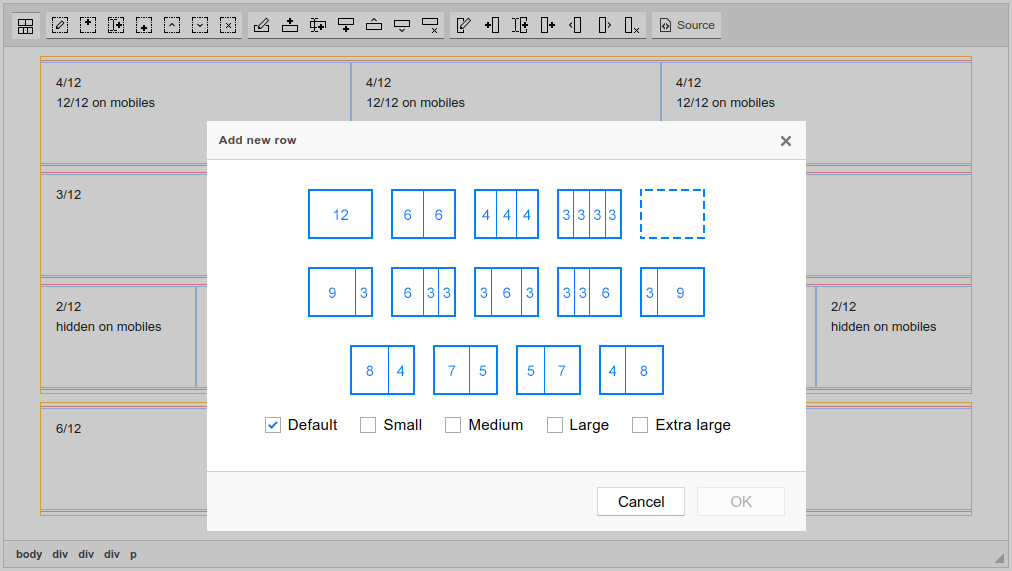
Grid rows and blocks, etc: all will be available to you after you install this bundle.

This bundle contains a number of plugins:

  • Bootstrap Include CSS/JS (Helps you to include (attach) Bootstrap's styles to your TinyMCE's document. Lets ability to see all blocks and elements as they will be shown on the site)
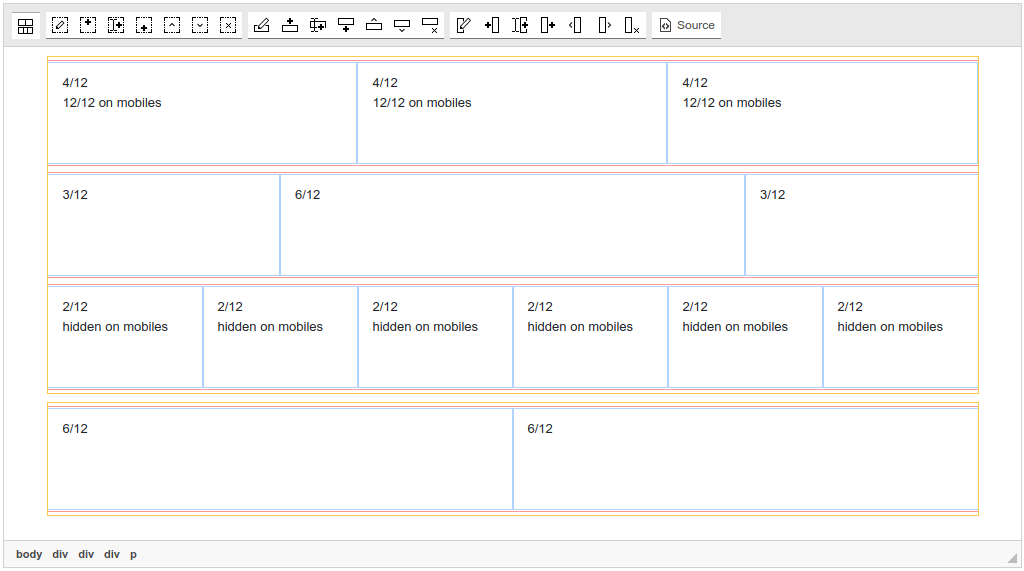
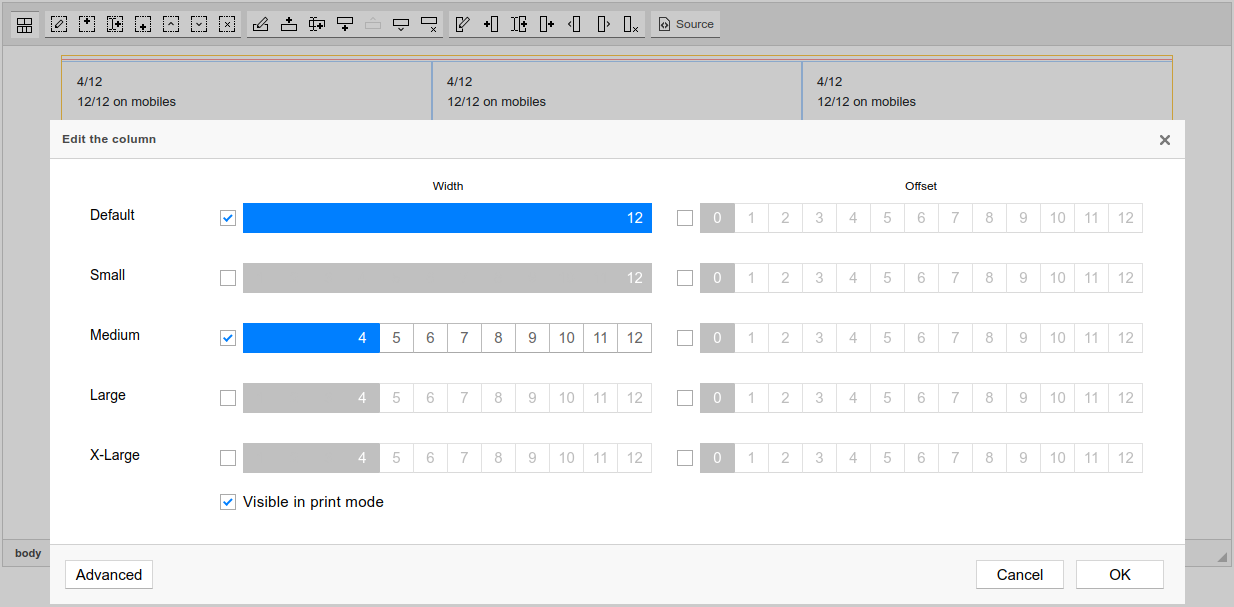
  • Bootstrap Block Configuration (Configure existing grid structure by selecting blocks and configuring their sizes and visibility options with help of the dialog)
CKEditor 4 logo CKEditor 4
TinyMCE 6 logo TinyMCE 6
TinyMCE 5 logo TinyMCE 5
TinyMCE 4 logo TinyMCE 4

Install Bootstrap Tools plugin in CKEditor 4

Download Bootstrap Tools
ZIP archive of Bootstrap Tools for CKEditor 4

Then do these simple steps:

  1. Copy BootstrapTools directory to ckeditor/plugins/.
  2. Edit CKEditor config and add BootstrapTools to extraPlugins parameter.

All the buttons this plugin will add to your toolbar automatically.

Using config file
Using initialization script

Example of configuring with config.js

If you prefer to edit config.js config file of CKEditor or when your CKEditor initialization code is placed inside some non-editable part of CMS, make these changes there:

CKEDITOR.editorConfig = function(config) {
    config.extraPlugins = "BootstrapTools";
};

Example of configuring inside initialization code

Some CMSs do not use config.js file and let to edit CKEditor initialization script only. Do this changes there:

CKEDITOR.replace("#editor", {
    extraPlugins: "BootstrapTools",
});

Install Bootstrap Tools plugin in TinyMCE 6

Download Bootstrap Tools
ZIP archive of Bootstrap Tools for TinyMCE 6
Self-hosted TinyMCE 6
Cloud TinyMCE 6

Install the plugin to TinyMCE 6 hosted on your server

  1. Copy BootstrapTools directory to tinymce/plugins/.
  2. Edit TinyMCE config and add BootstrapTools to plugins parameter.

All the buttons this plugin will add to your toolbar automatically.

Example

Here you can see sample TinyMCE initialization code with config inside it:

TinyMCE.init({
    selector: "#editor",
    plugins: "BootstrapTools",
});

Refer to TinyMCE add-ons installation manual for more details

Install the plugin to cloud edition of TinyMCE 6

  1. Copy BootstrapTools directory somewhere on your server where it can be accessible by a link.
  2. Specify the location of just copied Bootstrap Tools plugin adding key-value pair in external_plugins TinyMCE config parameter.
  3. Edit TinyMCE config and add BootstrapTools to plugins parameter.

All the buttons this plugin will add to your toolbar automatically.

Example

Here you can see sample cloud TinyMCE initialization code with config inside it:

TinyMCE.init({
    selector: "#editor",
    plugins: "BootstrapTools",
    external_plugins: {
        "BootstrapTools": "http://example.com/public/BootstrapTools/plugin.min.js",
    },
});

Refer to TinyMCE add-ons installation manual for more details

Install Bootstrap Tools plugin in TinyMCE 5

Download Bootstrap Tools
ZIP archive of Bootstrap Tools for TinyMCE 5
Self-hosted TinyMCE 5
Cloud TinyMCE 5

Install the plugin to TinyMCE 5 hosted on your server

  1. Copy BootstrapTools directory to tinymce/plugins/.
  2. Edit TinyMCE config and add BootstrapTools to plugins parameter.

All the buttons this plugin will add to your toolbar automatically.

Example

Here you can see sample TinyMCE initialization code with config inside it:

TinyMCE.init({
    selector: "#editor",
    plugins: "BootstrapTools",
});

Refer to TinyMCE add-ons installation manual for more details

Install the plugin to cloud edition of TinyMCE 5

  1. Copy BootstrapTools directory somewhere on your server where it can be accessible by a link.
  2. Specify the location of just copied Bootstrap Tools plugin adding key-value pair in external_plugins TinyMCE config parameter.
  3. Edit TinyMCE config and add BootstrapTools to plugins parameter.

All the buttons this plugin will add to your toolbar automatically.

Example

Here you can see sample cloud TinyMCE initialization code with config inside it:

TinyMCE.init({
    selector: "#editor",
    plugins: "BootstrapTools",
    external_plugins: {
        "BootstrapTools": "http://example.com/public/BootstrapTools/plugin.min.js",
    },
});

Refer to TinyMCE add-ons installation manual for more details

Install Bootstrap Tools plugin in TinyMCE 4

Download Bootstrap Tools
ZIP archive of Bootstrap Tools for TinyMCE 4

Then do these simple steps:

  1. Copy BootstrapTools directory to tinymce/plugins/.
  2. Edit TinyMCE config and add BootstrapTools to plugins parameter.

All the buttons this plugin will add to your toolbar automatically.

Example

Here you can see sample TinyMCE initialization code with config inside it:

TinyMCE.init({
    selector: "#editor",
    plugins: "BootstrapTools",
});

Refer to TinyMCE add-ons installation manual for more details

Reviews

This plugin has the potential to be a great grid editor! I love its minimalist and clean design.

User icon
Christos Y.
Individual

Building a column structure by hand can seem a little complicated. I have used this add-on for a while though. Right now I prefer the Bootstrap Editor add-on.

User icon
José A.
Individual

Tell a friend about Bootstrap Tools

Send